How To Optimize Your Author Bio For SEO Boost
Enjoy more trust from Google in 30 minutes of work.
Most SEO guidelines are to be applied whenever you write a new piece of content.
But then, there are a few SEO tips you need to implement just once on your blog. These are the low-hanging fruits.
Most EEAT implementations, like your Author Bio, come under the latter category.
The author’s Bio is critical to your website’s E-E-A-T profile (Experience, Expertise, Authoritativeness, & Trustworthiness). And you have full control over this factor.
In this guide, I will show you how to optimize your author bio and page to maximize your EEAT score in minutes.
Table of Contents
Getting started with your author bio on WordPress.
Firstly, some WordPress themes support full customization of the author bio box and author archives page.
It may make your life easier, but it is not a priority for me when choosing my WordPress theme. A high-quality general-purpose theme (like my favorite Astra) is good enough to follow this guide.
You may also be using plugins to design and decorate your author box or customize your author page, but it is your choice. I simply try to minimize the number of plugins in my WordPress installation.
Step 1: Create an awesome Author Persona.
The author persona is your personal branding, much like your Twitter/Instagram bio. It can give credibility to your blog post and introduce readers to your other works.
The author’s persona consists of a few details about the author, like:
- A brief introduction/description of the author.
- A photograph of the author for gravitas.
- A couple of relevant social media profiles.
Author Introduction
An Author’s persona may be real or made up but should not be concocted.
You do have a vast range of experiences in life. But you should only mention those experiences relevant to that blog’s niche.
For example, I have vast experience as a bank manager and insurance advisor. But there is no need to mention these experiences in my author persona for this blog, as this is about blogging, content marketing, and SEO.
A single author may have several personas, one each for each niche of the blog he is writing for.
The purpose of the author’s persona is to:
- Establish credibility for the content your reader is currently reading.
- Strike a personal connection with the reader to increase engagement.
- Promote your other blogs, personal brand, social media, and newsletter.
Here is a 4 step process for writing an amazing author bio.
1. Start with a byline introducing you and showing your most prominent relevant achievement.
2. Open up with other relevant biographical details and mention your credentials, like degrees, awards, and experience.
3. Now include personal connections to the work that helps readers imagine who you are.
4. Finish with a quip or interesting anecdote, and ask readers to stay connected with you through a website, social media, or an email newsletter.
Few Tips:
Keep it under 400 words.
Don’t be afraid to use ChatGPT. Use the above instructions as a prompt.
Author Profile Picture (Gravatar)
It surprises me how many bloggers do not update their photograph in their WordPress gravatar.
Your gravatar photo is the only visual element in your WordPress author box, so take some time to update a clear headshot in your author profile.
For this, you must visit Gravatar.com and log in/sign up with the same email address as the author’s WordPress user profile. Then, upload your photo and link it with the email address.
Remember, Gravatar is a tool that associates a photo with an email address throughout the WordPress ecosystem.
So, if you update your photo on Gravatar, It automatically appears on every WordPress post you have ever published on any WordPress blog you are using the same email address.
Your Gravatar photo also appears on every WordPress comment you ever made (on any WordPress blog) using the same email address.
Here are the best practices for a professional-looking profile picture.
- Pick a photo with the right expressions appropriate for the author’s persona.
- Do not wear sunglasses or accessories which make you look very different.
- Use a high-resolution image. Gravatar automatically optimizes it to the correct size.
- While uploading the photo, crop it to make sure your face takes up 60% of the frame.
You may select different photos for different personas, but then you have to use different email addresses for each one of them.
Author’s Social Media
Creating separate social media profiles for each author persona is unnecessary. In fact, it is futile to share social media links where you are not active at all.
The only decision you have to make in this step is to select 2-3 relevant social media platforms to include in your persona.
The selection of social media platforms depends on the niche of the blog; hence it may differ from persona to persona.
For example, for this blog about content marketing and SEO, I would include only Twitter and LinkedIn.
Step 2: Enable the Author Box & Schema.
Once your author persona is ready, filling up your author box becomes easy.
Go to WordPress dashboard > Users, then edit the profile of the corresponding author. Thoroughly fill up the profile, which is self-explanatory.
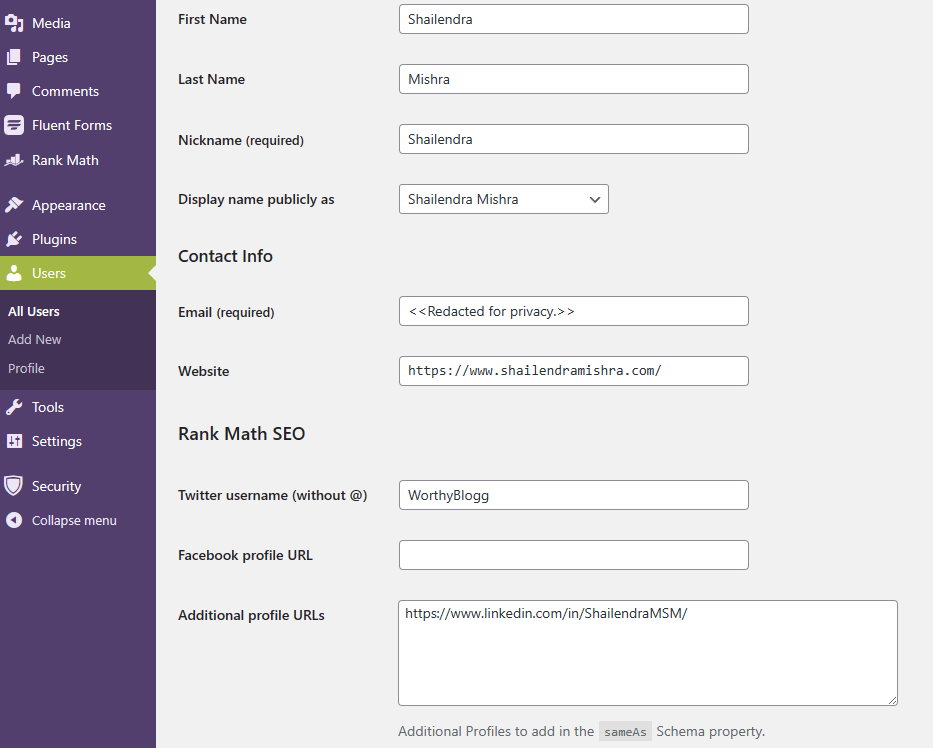
In the “Website” field, enter the URL of your personal website, or your best social media profile, or your About Me page. Your SEO plugin will automatically enroll this URL with SameAs schema property. If you have entered an about me page, make sure that page has “Person schema” implemented.
Next, your SEO plugin may enable a few more options like social media URLs and meta titles and descriptions. For example, RankMath enables profile URLs for SameAs schema. Here, I have used my Twitter and LinkedIn for this.
This is good for EEAT as it establishes that this person is SameAs the person in that website URL and that Twitter account. No schema affects how your Author box actually looks to your visitors.
Few Tips
It also supports emojis, so you may decorate your author’s description with relevant emojis.
The author’s description does not support paragraph breaks and line breaks by default.
If your author box contains links to your other blogs or social media channels, make sure to add nofollow tags to them. Remember this author box will appear on all of your blog posts, creating hundreds of external links.
If your WordPress theme does not support social media icons in the author box, you may install a plugin for author box customization. Simple Author Box is a good option here.
But in my experience, none of such plugins have schema support, so you have to use a good SEO plugin like RankMath or Yoast anyways.
So, author box plugins are totally unnecessary. I can always insert social media links in the description itself.
Important: Your WordPress theme may disable your author bio by default. In my case (Astra theme), I had to enable it from customization settings to make it visible on single posts.
Step 3: Customize or redirect your author archives page.
The default author URL in WordPress is located at:
https://www.website.com/author/usernameThere are two major issues in the default settings.
1. It is just an archives page listing all the posts this author published. If there is a single author on this website, this page becomes identical to the main archives page of the website.
2. It is one of the most linked pages on your blog, yet you do not control the contents of this page. You cannot even edit the meta title and description unless your WordPress theme/plugins have additional features for this purpose.
You may deal with this issue with another WordPress plugin, but it is much easier to simply redirect this URL to a dedicated SEO-optimized Author’s About Me page.
Important: If your website has several authors, creating a lot of individual author pages would be a lot of work. In that case, you may use a plugin or page builder like Elementor to customize author archives pages. It sets the template, and all author archive pages are automatically updated.
Creating the author’s “about” page.
An author’s about page is like your blog’s about page, except it talks about just the author as a person.
It is just an expanded version of the author box.
Here you may write your bio in much more detail. And you may upload more photographs for personal connection. All this while sticking to the author persona you created in the first step.
The most important use of this page is to establish E-E-A-T.
According to Kyle Roof, the renowned On-Page SEO and EEAT expert, the Trust signal in the EEAT is all about the people and organization behind the website.
You must optimize this about page for SEO as you would optimize any other article on your website. But importantly, you must use Person Schema. You can use any schema generator and insert the code or use your SEO plugin for this (I use RankMath)
Another good use of this page is to
If you are the only author in this blog, showing recent post archives is unnecessary, but including them is still a good idea. You can use the “latest posts” block in the Gutenberg editor for this.
Since this will be one of the most linked-to pages on your whole website, you may also include a curated list of your best content and encourage your visitors to read.
It is important to keep this page indexable.
And that is all.
Creating your author persona takes just a few minutes. You may also take your descriptions from your existing social media bio. Implementing various schemas does not take long either. And there you have a well SEO optimized author bio and author page.
Frequently Asked Questions
How Long Should Be My Author Bio?
The ideal length of the author bio description in the author box should be three to five lines. While comes about 250 to 400 words.
Does Author Bio affect my EEAT score?
Google really cares about the people who are responsible for the website. Having a descriptive author bio with proper schema and an indexable author about page really helps in establishing Trust in the EEAT algorithm.