Send Emails With A Custom Domain In FREE GMAIL (In 5 min)
You can use Gmail to send emails with any custom domain email alias. Here is the 5 min setup.
If you want to create a business email for your small business or website, you need not to pay for expensive business email products like Google Workspace.
You can do that from your existing free Gmail mailbox.
The setup takes only 5 minutes, and you can add up to 30 email aliases in a single Gmail account and start sending emails immediately.
Table of Contents
Prerequisite: 2-Step Verification should be enabled in your Google account
There is no reason why 2-step verification should not be already active in your Google account.
But even if it is disabled, it is time to activate it right now otherwise, this method would not work.
Go to https://myaccount.google.com/signinoptions/two-step-verification.
It may require you to authenticate your account again with the Google account password.
After login, If this page shows you that your 2-step verification is on already, keep the page open for the next step.
Otherwise, the page will show you steps to set your method of 2-step verification.
You can choose any of the following.
- Voice/text message on your phone number
- A physical security key (or biometric if your phone supports it)
- Google Prompt on a phone where you are logged in.
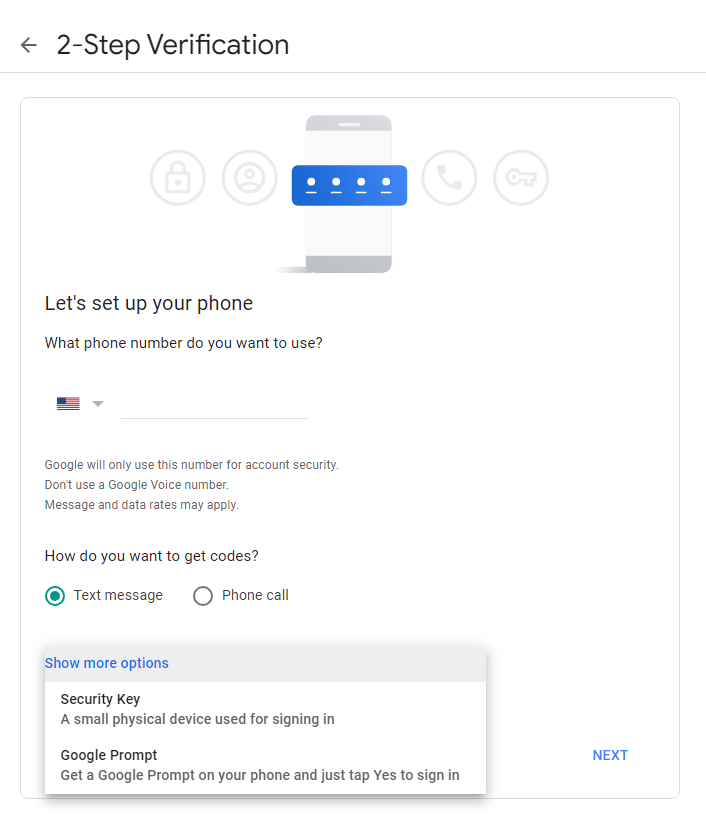
Other authentication methods like Passkeys, authenticator app, and backup codes appear only after you verify with one of the abovementioned methods.
Step 1: Create A New App Password (1 Minute)
If you are not already there, Go to https://myaccount.google.com/signinoptions/two-step-verification again.
Scroll down to the bottom of the page to find the app password tool. Click next.
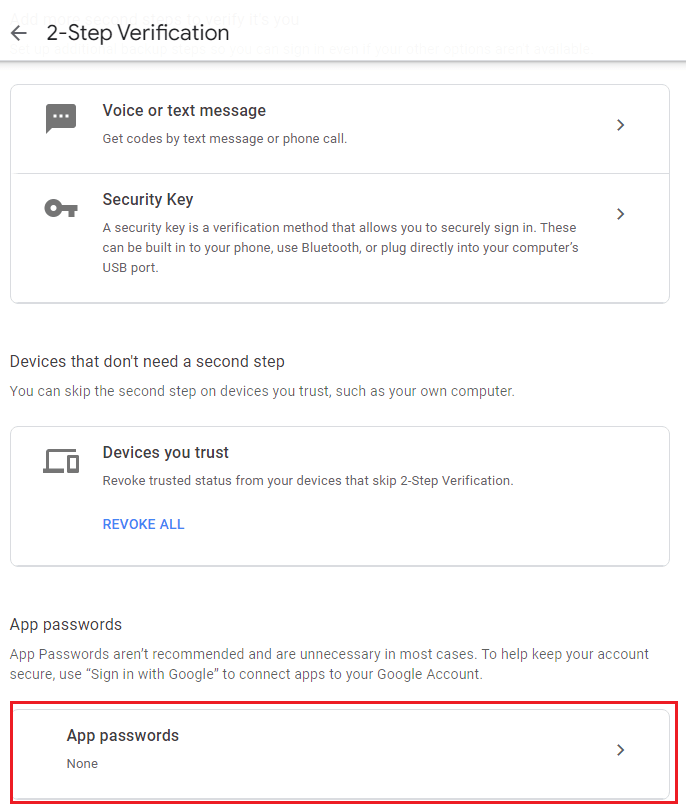
Enter a descriptive name (like “Key for SMTP using Gmail“) for your app password and click the create button.
A popup will appear which shows you your newly created 16-character app password.
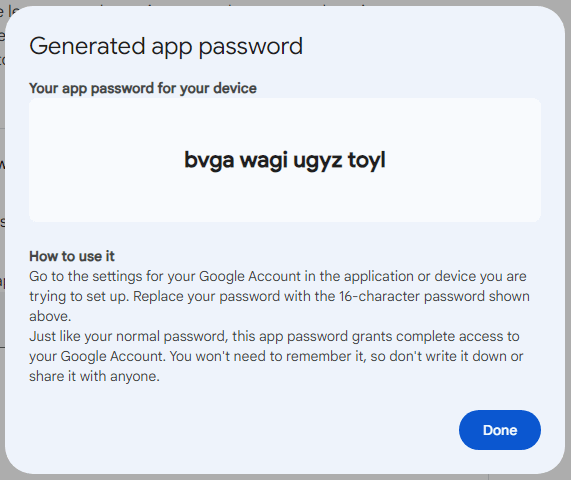
Copy it and keep it in a notepad for the next steps (Don’t worry about the spaces).
You need only one app password for one Google account and re-use it for all email aliases you will create in the next steps. So keep it in the notepad until you finish creating all aliases.
You may close this page once you have copied your app password.
Important
Step 2: Add the desired custom domain alias(es) in Gmail. (2 Minutes)
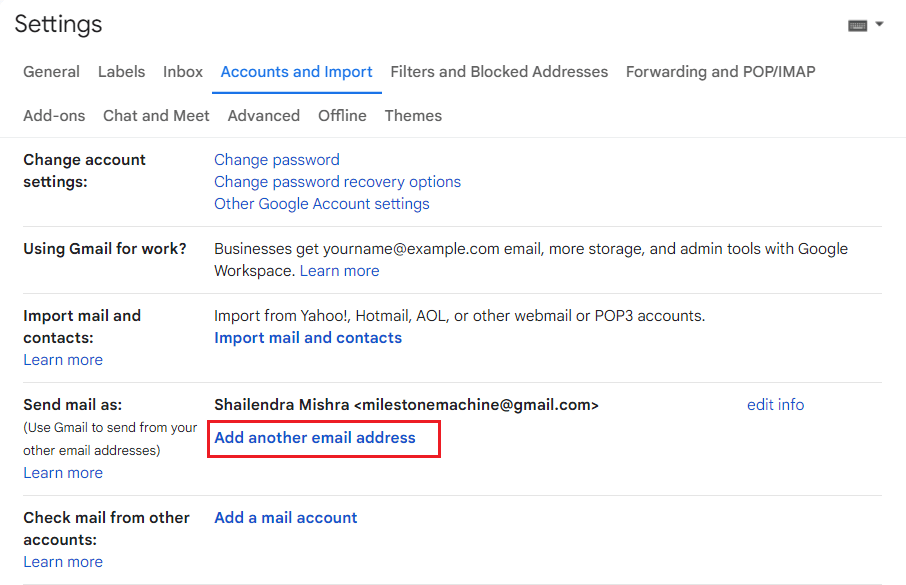
Go to https://mail.google.com/mail/#settings/accounts to find the Accounts page of the Gmail settings.
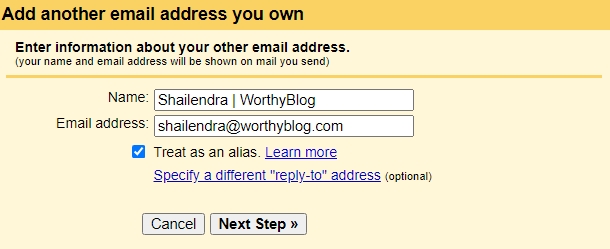
Find the “Send mail as” section and click the “Add another email address” link.
A new popup will open, as shown below. Choose any name and email address you want to create as your first alias. Click the Next Step button.
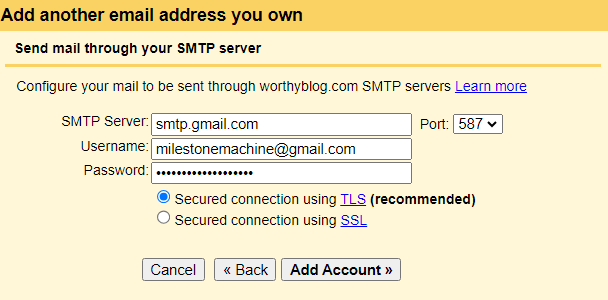
This is the page where you must enter valid SMTP credentials to send emails from your alias.
The SMTP settings are automatically populated, which is usually correct.
Note: Your Gmail ID and app password are your SMTP credentials to send emails.
Here are the correct SMTP settings to send emails using your Gmail account as an SMTP server.
SMTP Server: smtp.gmail.com
Post: 587
Username: <your free Gmail address>
Password: <your google app password>
Choose Secured connection using TLS option over SSL option.
Click the Next Step button.
Once you complete this step, you will see a confirmation message as below.
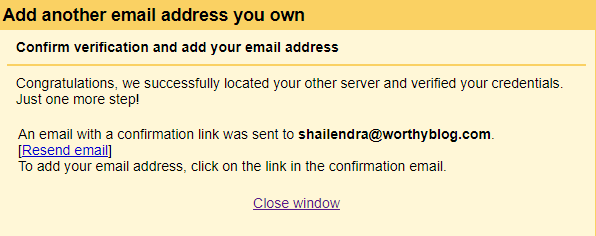
Now, you may close this popup, check your Gmail for a verification email, and click verify now button.
If you have the Accounts settings page still open, you will see your newly created alias appear in the “Send mail as:” section.

You may repeat step 2 to add multiple aliases in your Gmail dashboard.
Before you close this page, do not forget to make your preferred alias the default email to send emails.
Now, you will see your newly created email aliases in the From field of the compose box.
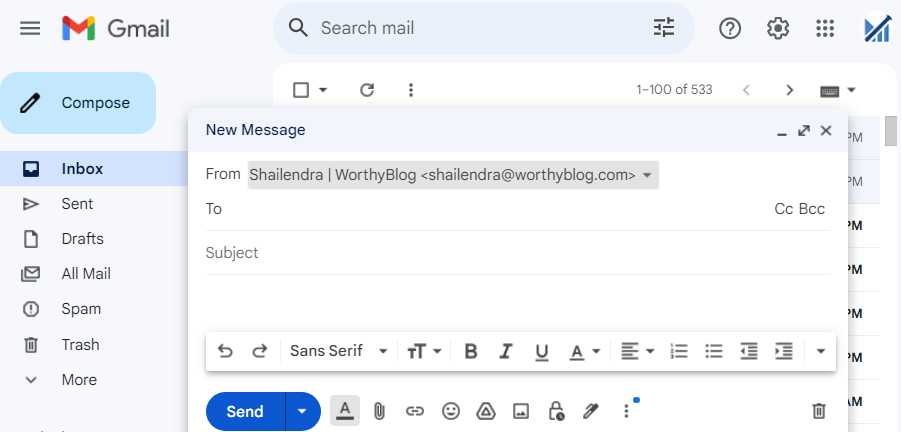
Anytime you want to send an email as an alias other than the default one, you may use the drop-down arrow next to the email.
Step 3: Update your SPF records (2 Minutes)
I haven’t told you so far that you can add any email address as an alias to your Gmail dashboard, whether or not you own that domain.
And, relying on the reputation of your Google’s SMTP, Google will even attempt to send that email.
But the receiver email service will most likely reject/block the email or send it to the spam folder.
Because you, as the domain owner, have not publicly designated Gmail as your official email-sending partner.
This is an oversimplification, of course, but it is very easy to set.
You must change only one DNS record in your hosting panel DNS settings.
Type: TXT
Host: @ (or leave blank)
Value: v=spf1 include:_spf.google.com ~all
TTL: 3600 (or leave default)
Important
Instead, edit the existing record and add include:_spf.google.com right before the ~all parameter.
Example:
If v=spf1 a mx include:_spf.mlsend.com ~all already exists,
make it v=spf1 a mx include:_spf.mlsend.com include:_spf.google.com ~all
Note: Wait about 24 hours before you send your first email to provide enough time for DNS propagation.
Finishing it up
Using a free Gmail account, it is very easy to send emails from any custom domain you have.
But this tutorial only helps you send emails using Gmail. To receive emails to that alias, you need to use one of the Free Email Forwarding Services to forward all your emails meant for your custom alias to your Gmail.